Sunday, May 29, 2011

JMF Video Chat Explained - Local Webcam Access


These series should give you insight into the architecture and implementation of my video chat.
This time I will dive into the Local testing mode of the application.

Overview

  • Learn how to access a webcam locally
Lets start


This image shows you the GUI of the local menu. When clicking on "Start capture" a local video of your webcam should show up. If not you might be asked to query first for existing devices.
Another issue was that the driver has some problems in accessing your webcam. Following error may occur: javax.media.NoDataSourceException: Error instantiating class: com.sun.media.protocol.vfw.DataSource : java.io.IOException: Could not connect to capture device

In my opinion, this is a bug in the driver dll, because when clicking another time on "Start capture" the webcam will get connected properly and everything works as usual.

What is now the magic behind that GUI?

Accessing the webcam

When clicking on "Start capture" a method called "startCapture" will be called.

LocalGUI.java

private void startCapture(){

iFrame = new JInternalFrame();
iFrame.setVisible(true);
iFrame.setSize(320, 250);
iFrame.setLocation(10, 40);
iFrame.setBackground(Color.BLACK);
iFrame.setBorder(BorderFactory.createEmptyBorder());
//disable moving of internal frame
BasicInternalFrameUI ui = (BasicInternalFrameUI)iFrame.getUI();
ui.setNorthPane(null);

try {
// activate the camera
String str2 = "vfw:Microsoft WDM Image Capture (Win32):0";
MediaLocator ml = new MediaLocator(str2);
//bei onboard camera gehts erst beim 3. Mal !!! (liegt am Treiber)
//vorher
//Error instantiating class: com.sun.media.protocol.vfw.DataSource : java.io.IOException: Could not connect to capture device
DataSource original = Manager.createDataSource(ml);
iFrame.getContentPane().add(cv.connectAndCapture(original));
} catch (NoDataSourceException e) {
handleStartError(e);return;
} catch (NoPlayerException e) {
handleStartError(e);return;
} catch (CannotRealizeException e) {
handleStartError(e);return;
} catch (IOException e) {
handleStartError(e);return;
} catch (NoTrackAvailableException e) {
handleStartError(e);return;
}
main.add(iFrame);

globalProps.put("localCaptureActive", true);
globalProps.put("localCaptureMainComponents", main.getComponents());
}

How does it work? Basically we create an JInternalFrame for displaying the video later. The important steps are done between the try and catch block. At first we state that we want the VFW - video for windows driver and create a new MediaLocator. From this medialcoator we can create a new DataSource. The last step is to connect to the webcam and capture live images and add these to the JInternalFrame. Let's have a look at the CaptureVideo class that will take care of the rest.

CaptureVideo.java
     public synchronized JPanel connectAndCapture(DataSource dataSource) throws NoDataSourceException, IOException, NoTrackAvailableException, NoPlayerException, CannotRealizeException{

JPanel video = new JPanel();
video.setLayout(new BorderLayout());

// DataSource clone1 = Manager.createCloneableDataSource(dataSource);

Processor processor = Manager.createProcessor(dataSource);
boolean result = waitForState(processor, Processor.Configured);
if (result == false) {
writeToConsole("Cant configure", ConsoleLogType.WARNING, log);
}
TrackControl[] tracks = processor.getTrackControls();
// Do we have at least one track?
if (tracks == null || tracks.length < 1)
throw new NoTrackAvailableException("Did not find any track to play");
Format format = tracks[0].getFormat();
Dimension size = ((VideoFormat) format).getSize();
float frameRate = ((VideoFormat) format).getFrameRate();
writeToConsole(frameRate + " " + size, ConsoleLogType.INFO, log);

VideoFormat jpegFormat = new VideoFormat(VideoFormat.JPEG_RTP,
new Dimension(320, 240), Format.NOT_SPECIFIED,
Format.byteArray, frameRate);
//todo change resolution from received video AND local camera
// tracks[0].setFormat(jpegFormat);
//works only from device not rtp stream
// FormatControl fmtc = ((CaptureDevice)dataSource).getFormatControls()[0];
// fmtc.setFormat(jpegFormat);

System.err.println("Video received as:");
System.err.println(" " + jpegFormat);
// ContentDescriptor cd = new ContentDescriptor(
// ContentDescriptor.RAW_RTP);
// processor.setContentDescriptor(cd);

result = waitForState(processor, Controller.Realized);
if (result == false) {
writeToConsole("Cant realize", ConsoleLogType.WARNING, log);
}

DataSource dataOutput = processor.getDataOutput();
dataOutput.start();

player = Manager.createRealizedPlayer(dataSource);
processor.start();
player.start();

Component comp;
if ((comp = player.getVisualComponent()) != null) {
video.add(comp);
}
return video;
}


What does now happen in this method? As the result will be a JPanel which can be easily attached to GUI components we have to create one. The next step is to create a Processor to have control over the datasource. When the processor is realized, we can create a Player that contains the visualcomponent which can be added to the Panel.

Note: It is important to follow a certain order when starting the processor and the player, otherwise you won't get it to work together.

That's basically everything to get a webcam working.

JMF Video Chat Explained - Querying Devices


These series should give you insight into the architecture and implementation of my video chat.
This time I will dive into querying devices (Webcams, Audio Cards) with the help of JMF(Java Media Framework).

Overview

  • Learn how to query media devices in JMF
Let's start

This is the window where all the magic happens. Clicking on "Query Devices" will start querying all available media devices. The question is what steps are required to perform this task?

Let's have a look at the source code:

DevicesGUI.java

     private class StartQueryingDevices implements ActionListener{

private DevicesGUI devicesGUI;

public StartQueryingDevices(DevicesGUI devicesGUI){
this.devicesGUI = devicesGUI;
}

public void actionPerformed(ActionEvent e) {
queryDevicesButton.setEnabled(false);
QueryDevicesThread qdt = new QueryDevicesThread();
qdt.addDeviceStatusListener(devicesGUI);
Thread t = new Thread(qdt);
t.start();
}

}


This inner class handles the click on the "Query Devices" Button. When clicked we create a new "QueryDevicesThread" and activate the Listener Pattern, so we get informed when the querying of devices has ended. Finally we start the thread. Let's look into the Thread.

QueryDevicesThread.java

package de.boehme.app.videochat.thread;

import java.util.logging.Logger;

import de.boehme.app.videochat.exception.ConsoleLogType;
import de.boehme.app.videochat.server.IDeviceQueryListener;

public class QueryDevicesThread implements Runnable {

private Logger log = Logger.getLogger(this.getClass().getName());

private IDeviceQueryListener deviceListener;

public void run() {

queryDevices();
deviceListener.ready();
}

private synchronized void queryDevices(){
//darf erst anfangen wenn alle anderen fertig sind
Class<?> directAudio = null;
Class<?> autoAudio = null;
Class<?> autoVideo = null;
Class<?> autoVideoPlus = null;
@SuppressWarnings("unused")
Object instanceAudio;
@SuppressWarnings("unused")
Object instanceVideo;
@SuppressWarnings("unused")
Object instanceVideoPlus;

// video... Windows
try {
autoVideo = Class.forName("VFWAuto");
} catch (Exception e) {
deviceListener.writeToConsole("No VFWAuto", ConsoleLogType.WARNING, log);
}

if (autoVideo == null) {
try {
autoVideo = Class.forName("SunVideoAuto");
} catch (Exception ee) {
deviceListener.writeToConsole("No SunVideoAuto", ConsoleLogType.WARNING, log);
}
try {
autoVideoPlus = Class.forName("SunVideoPlusAuto");
} catch (Exception ee) {
deviceListener.writeToConsole("No SunVideoPlusAuto", ConsoleLogType.WARNING, log);
}
}
// Linux??
if (autoVideo == null) {
try {
autoVideo = Class.forName("V4LAuto");
} catch (Exception eee) {
deviceListener.writeToConsole("No V4LAuto", ConsoleLogType.WARNING, log);
}
}

if (autoVideo != null)
try {
instanceVideo = autoVideo.newInstance();
} catch (InstantiationException e1) {
e1.printStackTrace();
} catch (IllegalAccessException e1) {
e1.printStackTrace();
}
if (autoVideoPlus != null)
try {
instanceVideoPlus = autoVideoPlus.newInstance();
} catch (InstantiationException e1) {
e1.printStackTrace();
} catch (IllegalAccessException e1) {
e1.printStackTrace();
}

// audio...

try {
directAudio = Class.forName("DirectSoundAuto");
} catch (Exception e) {
deviceListener.writeToConsole("No DirectSoundAuto", ConsoleLogType.WARNING, log);
}

try {
autoAudio = Class.forName("JavaSoundAuto");
} catch (Exception e) {
deviceListener.writeToConsole("No JavaSoundAuto", ConsoleLogType.WARNING, log);
}

if (directAudio != null)
try {
instanceAudio = directAudio.newInstance();
} catch (InstantiationException e) {
e.printStackTrace();
} catch (IllegalAccessException e) {
e.printStackTrace();
}
if (autoAudio != null)
try {
instanceAudio = autoAudio.newInstance();
} catch (InstantiationException e) {
e.printStackTrace();
} catch (IllegalAccessException e) {
e.printStackTrace();
}
}

public void addDeviceStatusListener(IDeviceQueryListener deviceListener){
this.deviceListener = deviceListener;
}
}


Whats happening here? Well, when the thread is started the method "queryDevices" will be called. Note: The Method is "synchronized" because the querying of devices will take place at a different spot, namely the .dlls will do the whole work for us. Thats why we dont have any control over the process, except to choose which type of devices should get queried. This can be seen when looking at autoVideo = Class.forName("VFWAuto");. Here we will look for the Video for windows driver and call him. The same operation will happen later for different operating systems like Linux.

As the querying is finished, we call .ready() method to return to the GUI class and display the resulting devices list.

That's all.

Saturday, May 21, 2011

Tapestry 5 on Jetty with MongoDB Part 2


If you haven't already read the previous Tutorial then I would suggest to: http://blog.boehme.me/2011/05/tapestry-51-on-jetty-with-mongodb-part.html

What does the second part cover?

Overview
  • Learn how to use DTO's in order to access mongoDB
  • Write your own ORM for better control
  • get deeper into mongoDB documents handling, i.e.accesing embedded documents etc.
Let's get started

While using native BSON objects in order to save/ read documents in mongoDB we want now to use custom DTO's to have more control.

To continue with the previous example we want to create users in a better way now. Therefore we create a new package "dto". Within this package we create a new Class "User".

User.java
package de.boehme.app.tapestry_mongodb.dto;

import java.io.Serializable;

import com.mongodb.BasicDBObject;

public class User extends BasicDBObject implements Serializable{

/**
*
*/
private static final long serialVersionUID = 8856991851254657487L;

private String username;
private Integer age;
private Address address;

public String getUsername() {
return (String) get("username");
}

public void setUsername(String username) {
put("username", username);
this.username = username;
}

public Integer getAge() {
return (Integer) get("age");
}

public void setAge(Integer age) {
put("age", age);
this.age = age;
}

public void setAddress(Address address) {
put("address", address);
this.address = address;
}

public Address getAddress() {
return (Address) get("address");
}

}


What do theses lines of code mean?
Well the first thing to mention is that we are now a subclass of BasicDBObject, which in fact allows us later on to save this DTO straight to a collection without converting or anything.

Then we need a way to save data to a document and also read data back from it. Therefore we added to the getters and setters "put" and "get" to save and retrieve data.

That's all we need to configure a POJO to be a mongoDB document.

Now we have to change our MongoDBHandler class to use the newly created User.class.
Go to MongoDBHandler.java and add following methods:
Note: I rather replaced the old methods

public void createUser(User user){
DBCollection coll = db.getCollection("userDTOCollection");
coll.setObjectClass(User.class);
coll.insert(user);
}

public List getAllUsers(){
List result = new ArrayList();
DBCollection coll = db.getCollection("userDTOCollection");
DBCursor cur = coll.find();
while(cur.hasNext()) {
User user = (User) cur.next();
result.add(user);
}
return result;
}


What do theses lines of code mean?

We now store directly a User Object into the collection. This gives a main advantage over storing just a String as we did before,
because now we are able to inlcude nearly anything into the object. Note that we have to call setObjectClass on the collection, to let it know which Type gets stored. I think the getAllUsers Method is self-explanaining.

Note: You also have to adjust the interface IMongoDBHandler to apply to the new methods!
Note2: You cannot use the same colllection from the first Example because we want to store now different Objects! Otherwise you get com.mongodb.BasicDBObject cannot be cast to de.boehme.app.tapestry_mongodb.dto.User

Refactoring the UserAdmin Page

The changes I did are marked green:

public class UserAdmin {

@Inject
private IMongoDBHandler mongoDB;

@Property
private String userName;
@Property
private Integer age;

@Property
private List<User> users;
@Property
private User user;

void onActivate(){
users = mongoDB.getAllUsers();
}

Object onSuccess(){
user = new User();
user.setUsername(userName);
user.setAge(age);
mongoDB.createUser(user);
users = mongoDB.getAllUsers();
return this;
}

}


Now modify the UserAdmin.tml


<html t:title="tapestry_mongodb Useradmin"
xmlns:t="http://tapestry.apache.org/schema/tapestry_5_1_0.xsd"
xmlns:p="tapestry:parameter">

<h1>Create User</h1>
<form t:type="form">
<t:errors />
Username: <input t:type="textfield" t:id="userName"/>
Age: <input t:type="textfield" t:id="age"/>
<input type="submit" value="Create User" />
</form>

<h1>User List</h1>
<t:loop source="users" value="user">
<h2>User: ${user.userName} Age: ${user.age}</h2>
</t:loop>
</html>


As you can see there are only little changes needed.
Now go navigate your browser to http://localhost:8080/useradmin and you will see following:

With this technique you have a kind of a ORM that helps you in developing new Object structures accessing mongoDB.

Diving deeper into mongoDB documents - embedded documents

What about having embedded documents in one document? Well, this part is not as obvious as one could imagine.

Normally you would just reference to other DTO's by doing this way:

public class User {

private Address address;
//getters setters
}

public class Address{

private String street;
private Integer houseNumber;
private String city;
//getters setters
}


The problem with the mongo-java-driver is that it cannot automatically convert those documents (e.g. a BasicDBObject) into your "Address" object.

When referencing Address in a page you would instantly get a com.mongodb.BasicDBObject cannot be cast to de.boehme.app.tapestry_mongodb.dto.Address Exception.

That's why we have to convert the embedded document first into an usable object.
Put this into your MongoDBHandler.java class:

@SuppressWarnings({ "unchecked" })
private <T extends BasicDBObject> T convertToDTO(BasicDBObject dbObject, Class<T> clazz) {
Object result = null;
try {
Class<T> cl = (Class<T>) Class.forName(clazz.getName());
result = cl.newInstance();
Class<?>[] par=new Class[1];
par[0]=Map.class;
Method m=cl.getMethod("putAll",par);
m.invoke(result, dbObject.toMap());
} catch (SecurityException e) {
e.printStackTrace();
} catch (IllegalArgumentException e) {
e.printStackTrace();
} catch (ClassNotFoundException e) {
e.printStackTrace();
} catch (InstantiationException e) {
e.printStackTrace();
} catch (IllegalAccessException e) {
e.printStackTrace();
} catch (NoSuchMethodException e) {
e.printStackTrace();
} catch (InvocationTargetException e) {
e.printStackTrace();
}
return (T) result;
}

What is this method basically doing? It gets the original unconverted document and the target class as input. Then via reflection API we just copy the complete content by calling "putAll" to the newly created object which in turn is now converted and ready to get used.

As this kind of work is tedious when having multiple embedded documents, I created a more advanced method that searches through one document for embedded documents and recursively converts them. That means if one embedded document also has embedded docuements they also get converted and so on.

Add following method to MongoDBHandler.java


@SuppressWarnings("unchecked")
private synchronized <T extends BasicDBObject> T searchForEmbeddedDocuments(BasicDBObject dbObject){
Class<T> documentClass = (Class<T>) dbObject.getClass();
Method[] methods = dbObject.getClass().getMethods();
//check each method if it returns a basicdbobject and thus convert this embedded document
for(Method m : methods){
//now check for return type:
//Embedded document return type class
Class<T> returnTypeClass = (Class<T>) m.getReturnType();
if(returnTypeClass.getSuperclass()!= null && returnTypeClass.getSuperclass().equals(BasicDBObject.class)){
//found embedded document
// System.out.println("Embedded doc at: " m.getName());
//now invoke map get method and get return object
try {
Class<?>[] par=new Class[1];
par[0]=String.class;
Method invokingMethod = returnTypeClass.getMethod("get",par);
//extract the getter methods name // THIS WORKS ONLY IF THE NAMING CONVENTION IS FOLLOWED
//THUS: private String myAttribute; results in the getter method: public String getMyAttribute(){return myAttribute;}
String invokingMethodName = m.getName().substring(3).toLowerCase();
BasicDBObject embeddedDocument = (BasicDBObject) invokingMethod.invoke(dbObject, invokingMethodName);
// System.out.println("Embedded: " embeddedDocument.getClass().getName());
/**STILL TODO:*/ //now search also this embedded document for further embedded documents
searchForEmbeddedDocuments(embeddedDocument);
T converted = convertToDTO(embeddedDocument, returnTypeClass);
// System.out.println(converted.getClass());
//now set/ put the newly converted dto to the existing document
par=new Class[2];
par[0]=String.class;
par[1]=Object.class;
invokingMethod = documentClass.getMethod("put",par);
invokingMethod.invoke(dbObject, new Object[]{invokingMethodName, converted});
} catch (IllegalArgumentException e) {
e.printStackTrace();
} catch (IllegalAccessException e) {
e.printStackTrace();
} catch (InvocationTargetException e) {
e.printStackTrace();
} catch (SecurityException e) {
e.printStackTrace();
} catch (NoSuchMethodException e) {
e.printStackTrace();
}
}
}
return (T) dbObject;
}

The code itself is commented so you should understand whats happening there.

Applying the new methods

Changes in getAllUsers() method:
public List<User> getAllUsers(){
List<User> result = new ArrayList<User>();
DBCollection coll = db.getCollection("userEmbeddedCollection");
DBCursor cur = coll.find();
while(cur.hasNext()) {
User user = (User) cur.next();
user.setAddress(convertToDTO((BasicDBObject)user.get("address"), Address.class));
result.add(user);
}
return result;
}


Changes made to the Page UserAdmin.java and UserAdmin.tml

UserAdmin.java
package de.boehme.app.tapestry_mongodb.pages;

import java.util.List;

import org.apache.tapestry5.annotations.Property;
import org.apache.tapestry5.ioc.annotations.Inject;

import de.boehme.app.tapestry_mongodb.dto.Address;
import de.boehme.app.tapestry_mongodb.dto.User;
import de.boehme.app.tapestry_mongodb.services.IMongoDBHandler;

public class UserAdmin {

@Inject
private IMongoDBHandler mongoDB;

@Property
private String userName;
@Property
private Integer age;
@Property
private String street;
@Property
private Integer houseNumber;
@Property
private String city;

@Property
private List<User> users;
@Property
private User user;

void onActivate(){
users = mongoDB.getAllUsers();
}

Object onSuccess(){
user = new User();
user.setUsername(userName);
user.setAge(age);

Address address = new Address();
address.setCity(city);
address.setHouseNumber(houseNumber);
address.setStreet(street);
user.setAddress(address);

mongoDB.createUser(user);
users = mongoDB.getAllUsers();
return this;
}

}


UserAdmin.tml

<html t:title="tapestry_mongodb Useradmin"
xmlns:t="http://tapestry.apache.org/schema/tapestry_5_1_0.xsd"
xmlns:p="tapestry:parameter">

<h1>Create User</h1>
<form t:type="form">
<t:errors />
Username: <input t:type="textfield" t:id="userName"/>
Age: <input t:type="textfield" t:id="age"/>
<br/>
Street: <input t:type="textfield" t:id="street"/>
House Number: <input t:type="textfield" t:id="houseNumber"/>
City: <input t:type="textfield" t:id="city"/>
<input type="submit" value="Create User" />
</form>

<h1>User List</h1>
<t:loop source="users" value="user">
<h2>User: ${user.userName} Age: ${user.age} <br/>
Address: ${user.address.street} ${user.address.houseNumber} ${user.address.city}
</h2>
</t:loop>
</html>


The Result


Again, if you want to have the full source code you can download the maven project from here:
Source: tapestry_mongodb_orm.zip


Remarks: If you still encounter errors as com.mongodb.BasicDBObject cannot be cast to de.boehme.app.tapestry_mongodb.dto.XYZ then you should delete old mongoDB database files from your dbpath. Link

Tapestry 5.1 on Jetty with MongoDB Part 1


This is the first time I am going to present a tutorial! The topic is, as the title already states, a step by step tutorial using the NoSQL database MongoDB with the according java-driver in Tapestry 5.

Following requirements have to be met before starting:

Requirements

  • Eclipse IDE (I chose 3.5.2 Galileo)
  • Eclipse Maven Plugin (m2eclipse sonatype)
  • Tapestry 5.1
  • mongo-java-driver 2.5.3
Set Up

I assume you already have set up Eclipse with Maven.

First step is to start Eclipse. Then go to File--> New--> Other --> Maven--> Maven Project
Click Next. Click Next again.
Type in "Filter" : org.apache.tapestry
Then choose the one with artifactId "quickstart" and version "5.1.0.5"
Click Next.
Type in your groupId, artifactId and click on Finish!

Dependencies

So now you got a basic Tapestry 5 Project correctly set up we need to configure additional dependencies we need to run mongoDB.

So rightclick on your project in the workspace --> chose maven --> add dependency
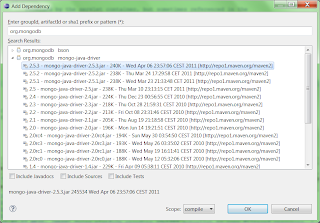
Type into the textfield "org.mongodb". Then choose the mongo-java-driver 2.5.3 or newer.


As we want to run our application on Jetty 7 we have to refactor the POM file a little bit.

Just replace everything in your "build" tag with this:
<build>
<finalName>tapestry_mongodb</finalName>
<plugins>
<plugin>
<groupId>org.apache.maven.plugins</groupId>
<artifactId>maven-compiler-plugin</artifactId>
<configuration>
<source>1.6</source>
<target>1.6</target>
<optimize>true</optimize>
</configuration>
</plugin>

<!-- Run the application using "mvn jetty:run" -->
<plugin>
<groupId>org.mortbay.jetty</groupId>
<artifactId>jetty-maven-plugin</artifactId>
<version>${jetty-version}</version>
<configuration>
<connectors>
<connector implementation="org.eclipse.jetty.server.nio.SelectChannelConnector">
<port>8080</port>
</connector>
</connectors>
</configuration>
</plugin>
</plugins>
</build>


Replace this at the bottom of your POM to set up the embedded jetty version.
<properties>
<tapestry-release-version>5.1.0.5</tapestry-release-version>
<jetty-version>7.1.6.v20100715</jetty-version>
</properties>

OK now that you have set up the basic part we can test run our application.
Rightclick your project in the workspace and choose "Run as" --> "Maven Build.."

In the upcoming popup type into the "Goal" field : "jetty:run".
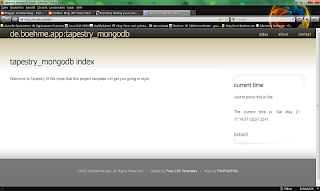
That's it. You should see something like this when navigating to http://localhost:8080/


Remark: For simplicity I removed all standard archetype generated pages + .tml files to have a better overview later on.

Setting up MongoDB

  1. Get the MongoDB according to your OS at http://www.mongodb.org/downloads
  2. Install it
  3. Run it
Setting up Tapestry to work with MongoDB

1. Creating a Tapestry Service to interact with MongoDB:

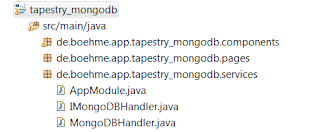
As we want to have access in our Tapestry Page through injecting a service we have to create a new Java Class in the services package. Lets call it MongoDBHandler. This class has to implements the interface IMongoDBhandler which we also create in the same package.
This looks like this:


There is only one step left, in order to access this service: We have to configure it in the global AppModule Class that Tapestry IOC knows where to find the service. Go into "AppModule" class and add following into the "bind" Method
public static void bind(ServiceBinder binder) {
binder.bind(IMongoDBHandler.class, MongoDBHandler.class);
}

Lets have a look at the MongoDBhandler Class and add some basic stuff to connect with our mongoDB. This will look something like this:


package de.boehme.app.tapestry_mongodb.services;

import java.net.UnknownHostException;
import java.util.ArrayList;
import java.util.List;

import org.apache.tapestry5.annotations.Log;

import com.mongodb.BasicDBObject;
import com.mongodb.DB;
import com.mongodb.DBCollection;
import com.mongodb.DBCursor;
import com.mongodb.Mongo;
import com.mongodb.MongoException;

public class MongoDBHandler implements IMongoDBHandler{

private DB db;

public MongoDBHandler() throws UnknownHostException, MongoException{
//set up db connection
connectToDatabase();
}

@Log
private void connectToDatabase() throws UnknownHostException, MongoException{
Mongo m = new Mongo();
this.db = m.getDB( "tapestry_mongodb" );
}
}


What does these code lines do? Well when we inject this service into a page and it will be used for the first time across the whole application it gets instantiated, thus the constructor gets called which leads to a connection to the MongoDB. Additionally we "activate" the database "tapestry_mongodb". If this database does not exist it gets automatically created.

Now lets prepare this service with a real example:
For instance we would like to create a new "User" and save it to the database. Therefore we need to add new method called "createUser" and for the output a "getAllusers" method.

add this to MongoDBHandler.java

public void createUser(String userName) {
//create a new BSON Object
BasicDBObject dbObject = new BasicDBObject();
dbObject.put("userName", userName);
//now get the collection
DBCollection coll = db.getCollection("userCollection");
coll.insert(dbObject);
}

public List<String> getAllUsers(){
List<String> result = new ArrayList<String>();
DBCollection coll = db.getCollection("userCollection");
DBCursor cur = coll.find();
while(cur.hasNext()) {
BasicDBObject dbObject = (BasicDBObject) cur.next();
result.add(dbObject.getString("userName"));
}
return result;
}

add this to IMongoDBhandler.java
   public void createUser(String userName);
public List<string> getAllUsers();

Now we can finally create our Tapestry Page.

2. Create a new Tapestry Page

Go to the "pages" package and create a new class "UserAdmin". The class will look like this:

UserAdmin.java
package de.boehme.app.tapestry_mongodb.pages;

import java.util.List;

import org.apache.tapestry5.annotations.Property;
import org.apache.tapestry5.ioc.annotations.Inject;

import de.boehme.app.tapestry_mongodb.services.IMongoDBHandler;

public class UserAdmin {

@Inject
private IMongoDBHandler mongoDB;

@Property
private String userName;

@Property
private List<String> users;

void onActivate(){
users = mongoDB.getAllUsers();
}

Object onSuccess(){
mongoDB.createUser(userName);
users = mongoDB.getAllUsers();
return this;
}

}

Now got to src/main/webapp and create the according .tml file:

UserAdmin.tml

<html t:title="tapestry_mongodb Useradmin"
xmlns:t="http://tapestry.apache.org/schema/tapestry_5_1_0.xsd"
xmlns:p="tapestry:parameter">

<h1>Create User</h1>
<form t:type="form">
<t:errors />
<input t:type="textfield" t:id="username"/>
<input type="submit" value="Create User" />
</form>

<h1>User List</h1>
<t:loop source="users" value="userName">
<h2>User: ${userName}</h2>
</t:loop>
</html>


Doing the first test and seeing the result

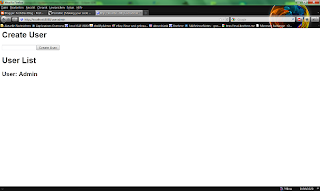
Now start up jetty with "jetty:run" and navigate in your browser to http://localhost:8080/useradmin

You will see following:


If you enter now a name e.g. Admin and click on "Create User" a new document will be created and saved to MongoDB. Additionally you see a full list of all "Users" underneath.

That's mainly everything for Part 1.
The next part will be about using DTO's in order to be more object-oriented. And we will build our own ORM in order to get the most out of mongoDB!

Note: Full source code as maven project avaiable here: tapestry_mongodb.zip

Go on to the 2nd part Tapestry 5.1 on Jetty with MongoDB Part 2